Linux操作
2024年8月23日大约 8 分钟后端linuxcentos7installlinux的基础命令linux安装软件vsfptd的配置靶场的搭建
linux
一、安装
省略……
二、Linux命令
1. scp
scp jdk-8u361-linux-x64.tar.gz root@thylove.cn:/file2. Vi/Vim
# 多行注释
ctrl + v  # 进入块模式

# 取消多行注释
ctrl + v   选中多选, 再输入x
3. lsof
查看端口占用
[root@localhost package]# lsof -i tcp:9090
COMMAND     PID USER   FD   TYPE DEVICE SIZE/OFF NODE NAME
prometheu 16628 root    7u  IPv6  59525      0t0  TCP *:websm (LISTEN)
prometheu 16628 root   11u  IPv6  51271      0t0  TCP localhost:60634->localhost:websm (ESTABLISHED)
prometheu 16628 root   12u  IPv6  51272      0t0  TCP localhost:websm->localhost:60634 (ESTABLISHED)
prometheu 16628 root   13u  IPv6  60093      0t0  TCP localhost.localdomain:websm->192.168.1.11:uohost (ESTABLISHED)
prometheu 16628 root   14u  IPv6  58533      0t0  TCP localhost.localdomain:websm->192.168.1.11:cdid (ESTABLISHED)
prometheu 16628 root   15u  IPv6  29587      0t0  TCP localhost.localdomain:websm->192.168.1.11:aicc-cmi (ESTABLISHED)
4. netstat
[root@localhost package]# netstat -nplt |  grep 9090
tcp6       0      0 :::9090                 :::*                    LISTEN      16628/prometheus
5. ens33
配置静态ip地址
[root@localhost ~]# vim /etc/sysconfig/network-scripts/ifcfg-ens33# ifcfg-ens33
TYPE="Ethernet"
PROXY_METHOD="none"
BROWSER_ONLY="no"
BOOTPROTO="static"
DEFROUTE="yes"
IPV4_FAILURE_FATAL="no"
IPV6INIT="yes"
IPV6_AUTOCONF="yes"
IPV6_DEFROUTE="yes"
IPV6_FAILURE_FATAL="no"
IPV6_ADDR_GEN_MODE="stable-privacy"
NAME="ens33"
UUID="99548f46-f8c0-4e7a-bbf6-5917b2befcd4"
DEVICE="ens33"
ONBOOT="yes"
IPADDR=192.168.1.15
NETMASK=255.255.255.0
GATEWAY=192.168.1.1
DNS1=8.8.8.8
DNS2=10.255.255.25重启网络服务
[root@localhost ~]# service network restart三、Linux安装软件
1 安装完成初始化
#1 关闭SELinux  修改 etc/selinux/config 文件 将SELINUX=enforcing改为SELINUX=disabled 然后重启服务器 reboot 即可

#2 关闭防火墙 systmctl stop firewalld
# 开放指定端口(8080端口):firewall-cmd --zone=public --add-port 8080/tcp --permanent (--permanent 表示永久生效,没有此参数重启后失效)
#重新加载firewall:修改配置后,必须重新加载才能生效:firewall-cmd --reload
#停用指定端口(8080端口):firewall-cmd --zone=public --remove-port 8080/tcp --permanent
#配置完之后记得重新加载firewall
#firewall-cmd对端口的操作,如开放端口等信息,都放在/etc/firewall/zones/public.xml中记录

#3 CentOS 7 配置yum阿里源
cd /etc/yum.repos.d/
ls
rm -rf ./*
# 配置阿里源
wget -O /etc/yum.repos.d/CentOS-Base.repo https://mirrors.aliyun.com/repo/Centos7.repo
# 配置扩展包
wget -O /etc/yum.repos.d/epel.repo https://mirrors.aliyun.com/repo/epel-7.repo

yum list

yum update

yum upgrade
2 安装 v2raya
先安装v2ray-core,从此处下载:https://github.com/v2fly/v2ray-core/releases
解压
sudo unzip v2ray-linux-64.zip -d /usr/local/v2ray-core然后拷贝geoip.dat和geosite.dat到/usr/local/share/v2ray/:
sudo mkdir -p /usr/local/share/v2ray/
sudo mv /usr/local/v2ray-core/*dat /usr/local/share/v2ray/
v2rayA安装,从此处下载:https://github.com/v2rayA/v2rayA/releases/
下载对应架构的包后安装:
rpm -ivh installer_redhat_x64_2.2.5.8.rpm配置v2rayA:
vim /etc/default/v2raya
# 在文件的最后添加
V2RAYA_V2RAY_BIN=/usr/local/v2ray-core/v2ray
V2RAYA_V2RAY_CONFDIR=/usr/local/v2ray-core
设置开机自启:
sudo systemctl enable --now v2raya
sudo systemctl status v2raya
浏览器访问:
http://127.0.0.1:2017
导入订阅,修改配置
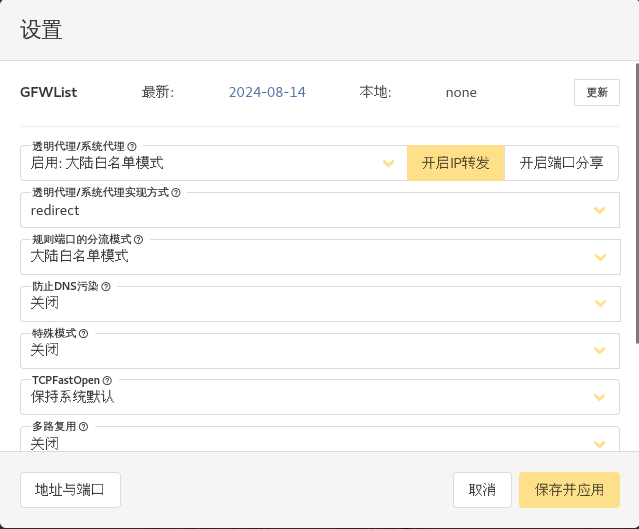
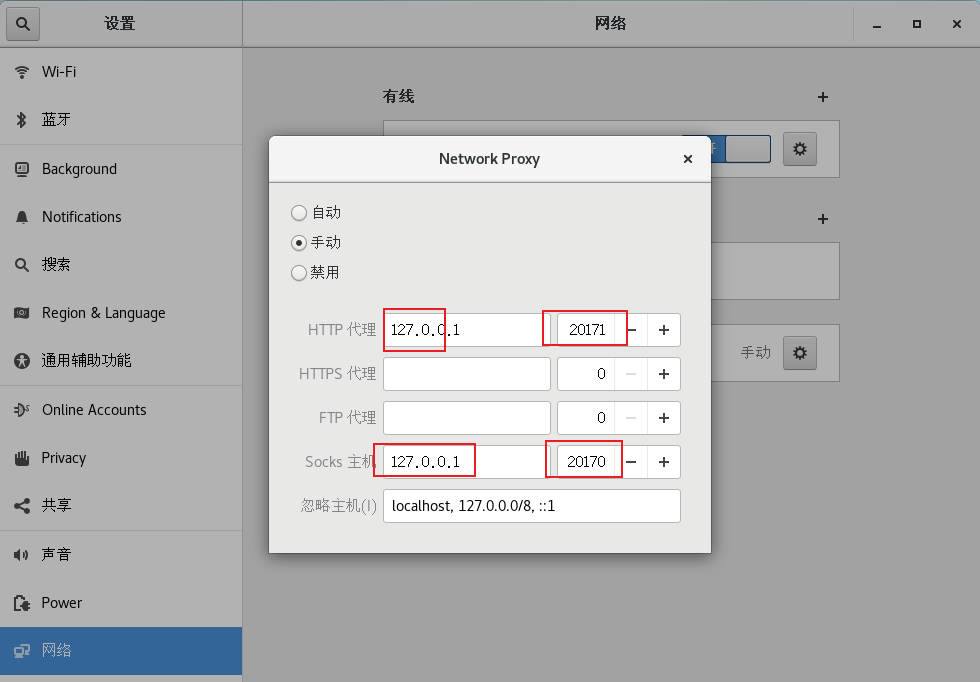
注:设置手动代理
3 kali靶场的搭建
https://github.com/vulhub
4 vsftpd配置
# Example config file /etc/vsftpd/vsftpd.conf
#
# Allow anonymous FTP? (Beware - allowed by default if you comment this out).
anonymous_enable=YES
#
# Uncomment this to allow the anonymous FTP user to upload files. This only
# has an effect if the above global write enable is activated. Also, you will
# obviously need to create a directory writable by the FTP user.
# When SELinux is enforcing check for SE bool allow_ftpd_anon_write, allow_ftpd_full_access
# 给/var/ftp/pub/ 写权限,才可以上传,只能上传。 chmod o+w /var/ftp/pub/
anon_upload_enable=YES
#
# Uncomment this to allow local users to log in.
# Uncomment this if you want the anonymous FTP user to be able to create
# new directories.
# 可以创建目录,但不可以重命名
anon_mkdir_write_enable=YES
#
# 可以对文件或目录,进行重命名、删除权限
anon_other_write_enable=YES
#
# 匿名用户登录的目录 (默认为/var/ftp)
#anon_root=/var/ftp/pub/
# If you want, you can arrange for uploaded anonymous files to be owned by
# a different user. Note! Using "root" for uploaded files is not
# recommended!
# 设置是否改变匿名用户上传文件(非目录)的属主
chown_uploads=YES
# 设置匿名用户上传文件的属主名,建议不要设置成root
chown_username=ftpthylove
#


# When SELinux is enforcing check for SE bool ftp_home_dir
local_enable=YES
#
# 本地用户登录之后的目录
#local_root=/ftpuser/ftpthylove
local_root=/var/ftp/
#
# Uncomment this to enable any form of FTP write command.
write_enable=YES
#
# Default umask for local users is 077. You may wish to change this to 022,
# if your users expect that (022 is used by most other ftpd's)
local_umask=022
#
# You may specify an explicit list of local users to chroot() to their home
# directory. If chroot_local_user is YES, then this list becomes a list of
# users to NOT chroot().
# (Warning! chroot'ing can be very dangerous. If using chroot, make sure that
# the user does not have write access to the top level directory within the
# chroot)
# A = chroot_list_enable, B = chroot_local_user
# ① 当A=YES,B=YES时,在 /etc/vsftpd/chroot_list 文件中的用户可以切换到其他目录,未在文件中列出的用户,不能切换到其他目录。
# ② 当A=YES,B=NO时,在 /etc/vsftpd/chroot_list 文件中的用户不可以切换到其他目录,未在文件中列出的用户,可以切换到其他目录。
# ③ 当A=NO,B=YES时,所有用户均不能切换到其他目录
# ④ 当A=NO,B=NO时,所有用户均可以切换到其他目录
allow_writeable_chroot=YES
chroot_local_user=YES
chroot_list_enable=YES
# (default follows)
chroot_list_file=/etc/vsftpd/chroot_list
#
# Activate directory messages - messages given to remote users when they
# go into a certain directory.
dirmessage_enable=YES
#
# Activate logging of uploads/downloads.
xferlog_enable=YES
#
# Make sure PORT transfer connections originate from port 20 (ftp-data).
connect_from_port_20=YES
#
# You may override where the log file goes if you like. The default is shown
# below.
#xferlog_file=/var/log/xferlog
#
# If you want, you can have your log file in standard ftpd xferlog format.
# Note that the default log file location is /var/log/xferlog in this case.
xferlog_std_format=YES
#
# You may change the default value for timing out an idle session.
#idle_session_timeout=600
#
# You may change the default value for timing out a data connection.
#data_connection_timeout=120
#
# It is recommended that you define on your system a unique user which the
# ftp server can use as a totally isolated and unprivileged user.
#nopriv_user=ftpsecure
#
# Enable this and the server will recognise asynchronous ABOR requests. Not
# recommended for security (the code is non-trivial). Not enabling it,
# however, may confuse older FTP clients.
#async_abor_enable=YES
#
# By default the server will pretend to allow ASCII mode but in fact ignore
# the request. Turn on the below options to have the server actually do ASCII
# mangling on files when in ASCII mode. The vsftpd.conf(5) man page explains
# the behaviour when these options are disabled.
# Beware that on some FTP servers, ASCII support allows a denial of service
# attack (DoS) via the command "SIZE /big/file" in ASCII mode. vsftpd
# predicted this attack and has always been safe, reporting the size of the
# raw file.
# ASCII mangling is a horrible feature of the protocol.
#ascii_upload_enable=YES
#ascii_download_enable=YES
#
# You may fully customise the login banner string:
#ftpd_banner=Welcome to blah FTP service.
#
# You may specify a file of disallowed anonymous e-mail addresses. Apparently
# useful for combatting certain DoS attacks.
#deny_email_enable=YES
# (default follows)
#banned_email_file=/etc/vsftpd/banned_emails
#
# You may activate the "-R" option to the builtin ls. This is disabled by
# default to avoid remote users being able to cause excessive I/O on large
# sites. However, some broken FTP clients such as "ncftp" and "mirror" assume
# the presence of the "-R" option, so there is a strong case for enabling it.
#ls_recurse_enable=YES
#
# When "listen" directive is enabled, vsftpd runs in standalone mode and
# listens on IPv4 sockets. This directive cannot be used in conjunction
# with the listen_ipv6 directive.
listen=NO
#
# This directive enables listening on IPv6 sockets. By default, listening
# on the IPv6 "any" address (::) will accept connections from both IPv6
# and IPv4 clients. It is not necessary to listen on *both* IPv4 and IPv6
# sockets. If you want that (perhaps because you want to listen on specific
# addresses) then you must run two copies of vsftpd with two configuration
# files.
# Make sure, that one of the listen options is commented !!
listen_ipv6=YES

pam_service_name=vsftpd
userlist_enable=YES
tcp_wrappers=YES
示例
# 允许匿名登录
anonymous_enable=YES
# 匿名登录的目录
anon_root=/ftpuser/ftpthylove/pub
# 允许本地用户登录
local_enable=YES

write_enable=YES
local_umask=022
# 本地用户登录的目录
local_root=/ftpuser/ftpthylove
# A = chroot_list_enable, B = chroot_local_user
# ① 当A=YES,B=YES时,在 /etc/vsftpd/chroot_list 文件中的用户可以切换到其他目录,未在文件中列出的用户,不能切换到其他目录。
# ② 当A=YES,B=NO时,在 /etc/vsftpd/chroot_list 文件中的用户不可以切换到其他目录,未在文件中列出的用户,可以切换到其他目录。
# ③ 当A=NO,B=YES时,所有用户均不能切换到其他目录
# ④ 当A=NO,B=NO时,所有用户均可以切换到其他目录
allow_writeable_chroot=YES
chroot_local_user=YES
chroot_list_enable=YES
chroot_list_file=/etc/vsftpd/chroot_list

dirmessage_enable=YES
xferlog_enable=YES
connect_from_port_20=YES
xferlog_std_format=YES
listen=NO
listen_ipv6=YES
pam_service_name=vsftpd
userlist_enable=YES
tcp_wrappers=YES
5. Minio的安装
wget https://dl.min.io/server/minio/release/linux-amd64/minio
chmod +x minio
MINIO_ROOT_USER=admin MINIO_ROOT_PASSWORD=wenbing1314 ./minio server /mnt/data --console-address ":9001" --address ":9000"

docker run -p 9000:9000 -p 9001:9001 --name minio -d --restart=always -e "MINIO_ACCESS_KEY=minio" -e "MINIO_SECRET_KEY=wenbing1314" -v /mnt/data:/data -v /etc/minio:/root/.minio minio/minio server /data --console-address ":9000" --address ":9001"
sudo docker run -d -p 3306:3306  --name mysql --privileged=true  -v /data/mysql/data:/var/lib/mysql  -e MYSQL_ROOT_PASSWORD=wenbing1314  mysql


docker run -p 3306:3306 --name mysql --restart always -v /data/mysql/conf/my.cnf:/etc/mysql/my.cnf -v /data/mysql/logs:/logs  -v /data/mysql/data:/var/lib/mysql -v --privileged=true -e MYSQL_ROOT_PASSWORD=wenbing1314 -d mysql


docker run -d -p 8080:8080 -p 50000:50000 -v /usr/docker/jenkins_data:/var/jenkins_home  -v /etc/localtime:/etc/localtime -v /usr/bin/docker:/usr/bin/docker     -v /var/run/docker.sock:/var/run/docker.sock   --restart=on-failure  -u 0 --name jenkins jenkins/jenkins:2.426.2-lts
四、脚本
1 java程序部署脚本
#!/bin/bash

APP_NAME=thylove-demo

#使用说明,用来提示输入参数
usage() {
    echo "Usage: sh deploy.sh [start|stop|restart|status]"
    exit 1
}

#检查程序是否在运行
is_exist(){
  pid=`ps -ef|grep $APP_NAME|grep -v grep|awk '{print $2}' `
  #如果不存在返回1,存在返回0
  if [ -z "${pid}" ]; then
   return 1
  else
    return 0
  fi
}

#启动方法
start(){
  is_exist
  if [ $? -eq "0" ]; then
    echo "${APP_NAME} is already running. pid=${pid} ."
  else
    nohup java -jar /ftpuser/ftpthylove/thylove-demo-0.0.1-SNAPSHOT.jar --server.port=8081 > nohup.out 2>&1 &
    echo "${APP_NAME} start success"
  fi
}

#停止方法
stop(){
  is_exist
  if [ $? -eq "0" ]; then
    kill -9 $pid
  else
    echo "${APP_NAME} is not running"
  fi
}

#输出运行状态
status(){
  is_exist
  if [ $? -eq "0" ]; then
    echo "${APP_NAME} is running. Pid is ${pid}"
  else
    echo "${APP_NAME} is NOT running."
  fi
}

#重启
restart(){
  stop
  start
}

#根据输入参数,选择执行对应方法,不输入则执行使用说明
case "$1" in
  "start")
    start
    ;;
  "stop")
    stop
    ;;
  "status")
    status
    ;;
  "restart")
    restart
    ;;
  *)
    usage
    ;;
esac
2 vsftpd安装脚本
#!/bin/bash

set -e

echo "🔍 检查是否已安装 vsftpd..."
if rpm -q vsftpd > /dev/null 2>&1; then
    echo "⚠️ 已安装 vsftpd,正在卸载..."
    systemctl stop vsftpd
    yum remove -y vsftpd
fi

echo "📦 安装 vsftpd..."
yum install -y vsftpd curl openssl

echo "🌐 获取公网 IP..."
PUBLIC_IP=$(curl -s ifconfig.me || echo 127.0.0.1)
echo "📡 公网 IP 为:$PUBLIC_IP"

echo "🛠 配置 vsftpd..."
cat > /etc/vsftpd/vsftpd.conf <<EOF
anonymous_enable=YES
anon_root=/var/ftp
anon_upload_enable=YES
anon_mkdir_write_enable=YES
anon_other_write_enable=YES
local_enable=YES
local_root=/var/ftp
write_enable=YES
local_umask=022
xferlog_enable=YES
xferlog_std_format=YES
log_ftp_protocol=YES
connect_from_port_20=YES
listen=YES
listen_ipv6=NO
pasv_enable=YES
pasv_min_port=40000
pasv_max_port=40100
pasv_address=$PUBLIC_IP
pam_service_name=vsftpd
userlist_enable=YES
tcp_wrappers=YES
ssl_enable=YES
allow_anon_ssl=YES
force_local_data_ssl=NO
force_local_logins_ssl=NO
rsa_cert_file=/etc/pki/tls/certs/vsftpd.pem
rsa_private_key_file=/etc/pki/tls/certs/vsftpd.pem
EOF

echo "🔐 生成 TLS 证书(如无)..."
if [ ! -f /etc/pki/tls/certs/vsftpd.pem ]; then
    openssl req -x509 -nodes -days 365 -newkey rsa:2048 \
        -keyout /etc/pki/tls/certs/vsftpd.pem \
        -out /etc/pki/tls/certs/vsftpd.pem \
        -subj "/C=CN/ST=Test/L=Test/O=Test/OU=Test/CN=vsftpd"
fi

echo "📁 设置 FTP 目录权限..."
mkdir -p /var/ftp/upload
chown ftp:ftp /var/ftp/upload
chmod 777 /var/ftp/upload
chown -R wb:wb /var/ftp
chmod -R 755 /var/ftp
echo "✅ 创建本地用户 wb(如未存在)..."
if ! id wb > /dev/null 2>&1; then
    useradd -m wb
    echo "wb:wb123" | chpasswd
fi

echo "🧹 清理黑名单防止 anonymous 登录失败..."
sed -i '/^ftp$/d' /etc/vsftpd/ftpusers || true
sed -i '/^ftp$/d' /etc/vsftpd/user_list || true

echo "🚀 启动并启用 vsftpd 服务..."
systemctl enable vsftpd
systemctl restart vsftpd

echo "✅ 完成!可以匿名访问 ftp://$PUBLIC_IP/upload"
echo "👉 管理员账号:wb / wb123"